Connecting cables with crimps and lugs
The connectors you use to connect your cable to your battery, inverter or anything else in your RV are equally as important as the cable you use.
We've compiled a list of connectors in a typical RV system and the appropriate tools to use to secure those connectors. We also take a look at how a good connection is made and the problems with a poor connection method.
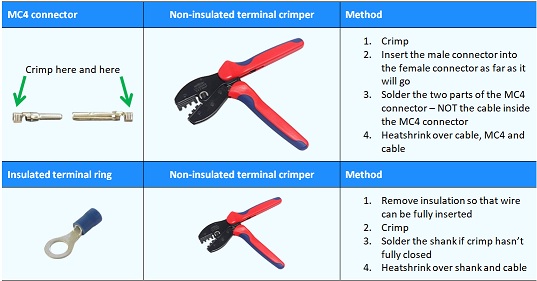
Small wires
Some wires which provide information (such as battery sensing wires), or that turn equipment on or off (such as relays, mains charger or the remote control for an inverter) are quite thin wires, as they carry a very small amount of current. Typically, this type of wire carries less than 1 amp.
These wires should have an insulated terminal or bootlace ferrule on the end for connecting to the device that requires them. The bootlace ferrule holds all the conductor wires together and stops them from being broken by a clamping screw. If these wires need to connect to a terminal, a ring connector is more likely to be required.
Large cable
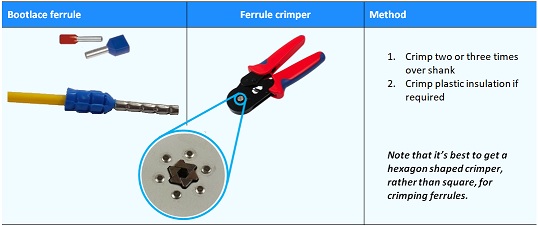
If you are using an inverter, you are drawing a sizeable current from your battery. We strongly recommend you use zero gauge cable, the copper conductor of which is approximately 50mm squared in area.
The lug which connects the cable to the battery should be properly crimped with a hydraulically operated hexagon die, NOT soldered, and NOT crimped with a pinch type crimper. The reason for using a hexagon die that is hydraulically crimped is that the fine copper strands that make up the cable will become virtually compressed into a solid piece of copper. This is much better for ensuring a good connection between the cable, the lug and the terminal that the lug is attached to. This type of connection is also far less likely to suffer damage from the vibration in an RV.
In an RV, we typically crimp from 6B&S to zero gauge with this type of lug.
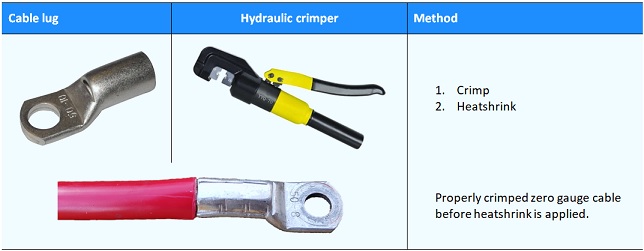
MC4 connectors for solar cabling
We use a non-insulated terminal crimper for MC4 connectors when joining solar panels or extending solar panel wiring.
Why not a pinch crimper?
We don't use pinch crimpers at all. This is what a pinch crimper looks like:
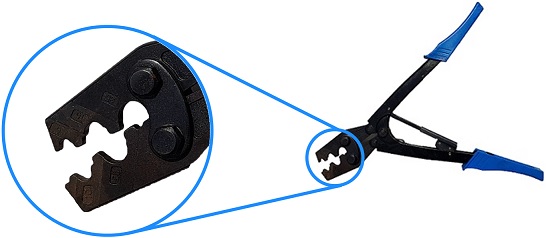
It works by essentially caving in one side of the lug shank into the other side and it's often used by people who are more interested in a quick job than a good job.
Now let's take a close look at some pinch-crimped lugs below to see why we recommend you steer clear of this type of crimping.
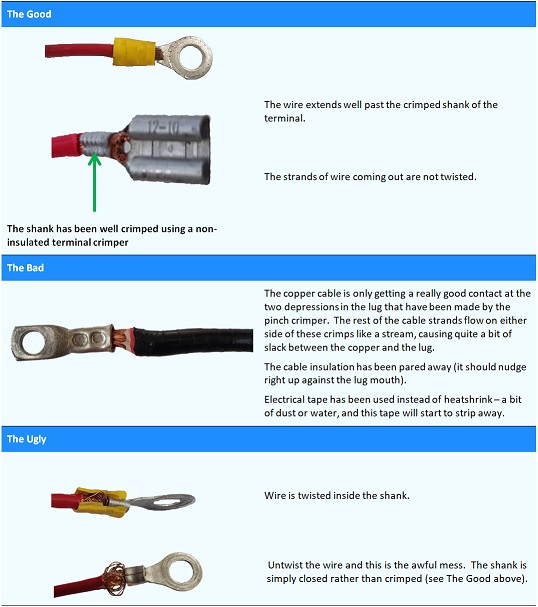
Firstly, let's be clear: there is a way to solder cable into a lug. If you need to do this, drop us an email and we'll detail the method on this web site, but we're hoping you avoid this method if possible. It's also quite a lengthy explanation - we're happy to do the work if the demand is there.
The way NOT to solder cable into a lug is by stripping off the required amount of insulation from the cable, shoving the cable into the lug, then heating up the lug and pushing solder into the lug.
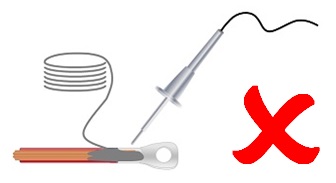
Solder wicks into the lug, but also along the cable
The risk of soldering this way is that you won't get full penetration to the bottom of the lug/cable joint, leaving a dry patch with very little contact to transfer the current. Also, the solder wicks up the cable under the insulation, making the wires brittle where the soldering ends. Any movement of the cable will cause these fine wires to break at that point under the insulation. Everything looks okay on the outside, but inside the cable insulation, the damage is unseen.

We look at cable sizes that we use in a RV lithium installation, why size is so important, and show an example of what you see is not what you get.
Your battery and inverter are the power houses of your RV. The best in the world cannot overcome sub-standard cabling and poor connections.
Our recommended cable sizes from your panels, to extending that cabling to a junction box and from the junction box to your solar controller, with a look at the vagaries of MC4 connections and the need for circuit breakers so you can isolate your solar input.
